REST stands for REpresentational State Transfer. It’s a system architecture developed with large distributed systems in mind (i.e., the internet). I will not teach you what REST is. This is not a topic for a WordPress deep dive. This is a topic for a system design deep dive (which I may do one day). As such, if you don’t know what REST is, go and learn it on your own.
The WordPress REST API is WordPress’s implementation of this architecture. It was added to WordPress in 2016 (version 4.7) and is the backbone of modern WordPress (particularly the Block Editor). It has only been gaining significance ever since. This chapter is extremely important if you want to be a competent WordPress developer – pay attention.
The Big Picture
Before we dive into how it works, we have to start with why it exists. The REST API is an attempt at decoupling WordPress from WordPress, however ridiculous that might sound. Before 4.7, WordPress was very self-contained.
What would you do if you wanted to create a mobile app for your website? Use the XML-RPC? You already know why that’s a bad idea. Use admin-ajax? Good luck writing all the proprietary actions and defining their schema. There wasn’t a widely accepted, standardized API allowing third party systems to interact with the data on your site.
The REST API changed that. First of all – REST was (and still is) by far the most popular architecture for web APIs. It uses JSON, which is a data format with excellent support across pretty much all languages. It is inherently decoupled from WordPress. Theoretically, no knowledge of WordPress is required to use the REST API – if you know REST then you know the rules of the API.
WordPress was created with the templating system in mind. This system, while good for simple blogs, doesn’t scale well for enterprise-grade applications, which almost always require many external integrations.
The REST API provides a uniform way of accessing and modifying your site’s data that is almost completely detached from WordPress. It is its own standardized and highly structured alternative layer you can use to interact with your website. You can use it to get a list of all posts, a single post’s content, or even modify a post if you authorize (and all of that using simple JSON requests and responses).
Technical Details
The root URL of the API is /wp-json/. If you visited https://example.com/wp-json/, you’d see a list of all endpoints available on the site (spoiler: there’s a lot). WordPress prevents name collisions with namespaces. The core namespace is “wp/v2”. Our plugin’s namespace could be “pgn/v1”.
In the context of the WordPress REST API, a route is a URI (after /wp-json). The core posts route is /wp/v2/posts. An endpoint is a mapping of a route to an HTTP method. That is – “GET /wp/v2/posts” is an endpoint, and so is “POST /wp/v2/posts”. The first one returns a list of posts and the second one lets you create a new post. They use the same route, but the endpoint (and the code they run) is completely different.
An example response to a GET request to /wp-json/wp/v2/posts/1/ is (truncated because it’s large):
{
  "id": 1,
  "date": "2024-07-26T12:39:56",
  "date_gmt": "2024-07-26T12:39:56",
  "guid": {
    "rendered": "http://localhost:8001/?p=1"
  },
  "modified": "2025-09-16T21:14:08",
  "modified_gmt": "2025-09-16T19:14:08",
  "slug": "hello-world",
  "status": "publish",
  "type": "post",
  "link": "http://localhost:8001/hello-world/",
  "title": {
    "rendered": "Hello world!"
  },
  "content": {
    "rendered": "\n\u003Cp class=\"has-text-align-left\"\u003EHello, World!abcdea\u003C/p\u003E\n\n\n\n\u003Cp\u003E\u003C/p\u003E\n",
    "protected": false
  },
  "excerpt": {
    "rendered": "\u003Cp\u003EHello, World!abcdea\u003C/p\u003E\n",
    "protected": false
  },
  "author": 1,
   // [...]
}A list of all core endpoints, along with their schema definition (returned/expected fields and their data types), is available in the REST API Reference. Some of the more interesting routes include:
- /wp/v2/posts
- /wp/v2/pages
- /wp/v2/categories
- /wp/v2/comments
- /wp/v2/users
- /wp/v2/search
- and more…
The API supports GET query parameters like ?per_page=25&page=2 and many more. Different endpoints support different parameters and you can find them all in the reference. There are also global “meta-parameters” which can be used for all core endpoints. The most useful one is “_fields”, which lets you filter the fields returned, for example: /wp/v2/posts?_fields=id,author,title.
The Request Lifecycle
For the most part, the request lifecycle for a REST request looks exactly like a normal request (which we’ve covered at the beginning of this guide). It hits index.php, calls wp-load.php, then goes to wp-settings.php (which loads the entire core, themes, plugins, and calls the init action), and finally executes $wp->parse_request().
1. rest_api_init()
parse_request() is where a REST request diverges from a normal request, but we’re getting ahead of ourselves. The first major step happens just before parse_request() runs – on the init hook (run at the end of wp-settings.php). The rest_api_init() function is attached to this hook. This function has only one job – to prepare WordPress for parsing the URL.
See, we’ve been using the pretty permalink version of the REST API, but if you remember from the beginning of this guide, that’s not the default permalink structure. The default structure (plain permalinks) is dependent on query parameters, i.e., example.com?p=123. If you were to use the REST API with this structure, instead of accessing example.com/wp-json/wp/v2/posts, you’d have to access example.com/?rest_route=/wp/v2/posts. That’s the plain equivalent of the pretty permalink.
WordPress core developers are smart. They knew it’d be a pain in the ass to try to handle different URL structures differently. Instead, why bother? The rest_api_init() function adds the ?rest_route parameter to the list of query vars and registers rewrite rules to move the value found after /wp-json/ to this parameter. Because of that, the internals of the API don’t care if a pretty permalink structure was used. They always read the route from the “rest_route” query var. This is part of the Rewrite API which you’ll learn soon.
2. URL Parsing
The parse_request() method is where this rewriting happens. It populates $wp->query_vars[‘rest_route’] with the route (e.g., “/wp/v2/posts”). At the end of its execution, it does a very important thing – it executes the parse_request action. This action is the last part the REST API request lifecycle shares with the lifecycle of a normal request. Remember, we’re now in stage 6 out of 7 of a typical request lifecycle, just before querying the database for posts (which will never happen).
3. rest_api_loaded()
The function rest_api_loaded() is hooked to the parse_request action. The first thing it does is it checks if the request is a REST API request (by checking if the “rest_route” query var is not empty). If it is a REST request then we’re officially in the “REST API request lifecycle” part. It defines the “REST_REQUEST” constant and continues handling the request.
The first step is instantiating a WP_REST_Server object. This object is responsible for handling the request, and that’s exactly what happens when rest_api_loaded() calls $server->serve_request($route). This is the “front controller” for this class – it’s the only method rest_api_loaded() calls before exiting.
But once again, we’re getting ahead of ourselves. Right after instantiating the server, the “rest_api_init” action is fired (don’t confuse it with the rest_api_init() function). It is on this action that you are supposed to register your endpoints. All of the core endpoints, along with custom ones from themes and plugins (which we’ll cover soon), are registered now. The WP_REST_Server object stores all of these endpoints (their routes, methods, callbacks, etc.) in an array.
4. $server->serve_request()
As I already said, after registering all the endpoints, rest_api_loaded() calls the serve_request() method on the server. This is the main method that handles the request. It begins by instantiating a WP_REST_Request object. This object is just a one-stop object for all information about this request, i.e., the method, route, body, headers, parameters, etc. Most of its methods are getters and setters.
The next step is returning CORS headers and checking authentication (which we’ll cover later). Then, assuming authentication passed, the dispatch( $request ) method is called. This method finds the correct endpoint handler (callback), validates and sanitizes the parameters, calls the permission callback, executes the handler (which usually returns an associative array that will eventually become the response body), and finally creates and returns a WP_REST_Response object.
Finally, other response headers are sent along with the status code and the response (encoded to JSON) is echoed.
5. die()
The execution goes back to rest_api_loaded() which calls die().
Authentication
Let’s go back to the authentication check performed in the middle of $server->serve_request(). It’s really just one line: apply_filters( ‘rest_authentication_errors’, null ). All authentication functions hook to this filter. They have to return WP_Error if authentication fails, true if it succeeds, or null if it wasn’t applicable. The dispatch() method is not called only if the value returned is a WP_Error.
In reality, when you think of “anonymous” requests to the REST API, you’re thinking about these filters returning null. There are two authentication methods available by default: cookie authentication and basic auth with application passwords. Both of their authentication checking functions hooked to this filter return WP_Error only if the authentication is actually attempted in the request but fails (a bad nonce, a wrong password, etc.).
If no authentication is attempted – they will just return null. But what if the endpoint requires authentication, like the endpoint for creating a post? Well, in reality, the rest_authentication_errors filter is not the main gate to your endpoints. It’s only a bouncer on the outside (before any real processing happens) whose job is to block requests that try to authenticate but fail.
The real endpoint-specific permission check happens in the permission_callback specified when registering the endpoint. This callback is supposed to check if the current user has the necessary permissions to access this endpoint. That’s where you’d check if the user can create a new post and return false if they can’t. That will stop the execution before the main endpoint handler is called and return a 401/403.
Cookie Authentication
This is the standard authentication method used in WordPress. You already know everything about it. It works based off of cookies like wordpress_logged_in_{COOKIEHASH}.
Every request needs to contain a nonce – either passed as a _wpnonce GET/POST parameter or via the X-WP-Nonce header. The nonce uses the “wp_rest” action, that is – it’s generated and verified with wp_create_nonce( ‘wp_rest’ ). You have to pass this nonce to your script and include it in your requests (unless you’re using the built-in WordPress Backbone.js library which takes care of that for you).
Notice that, because this authentication method is based on the authentication cookies and nonces, it really only works for requests made from the browser of a logged-in user. If you were to create a script that had to interact with the REST API, like a python script run from your computer, it wouldn’t be practical to use this method. That’s why application passwords were added.
Basic Authentication With Application Passwords
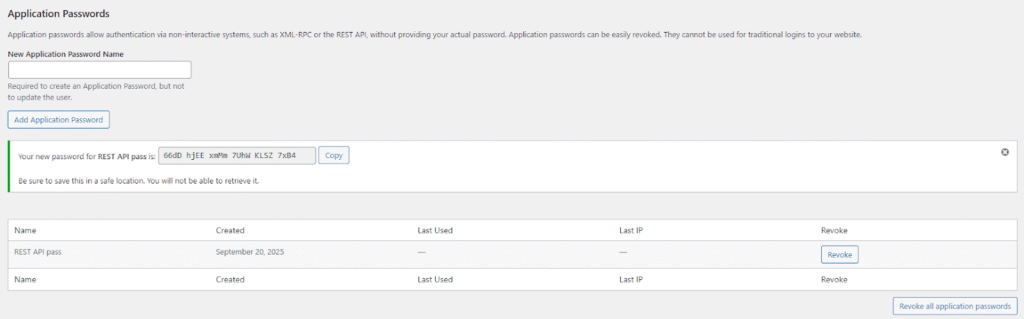
WordPress 5.6 added support for Application Passwords. An application password is a random 24-characters long alphanumeric token. Every user can generate multiple application passwords for themselves. An application password is always tied to a user account. Here’s what adding an application password with name “REST API pass” looks like:
Application password can’t be used for normal login with /wp-login.php. They are meant only for non-interactive systems, such as the REST API and XML-RPC (and other APIs added to WordPress in the future).
You can authenticate with the REST API using an application password with the Basic Auth (RFC 7617) scheme. This HTTP authentication method is, as the name implies, basic. It sends an Authorization header with a base64-encoded string containing the username and password (in the “username:password” format). Here’s what such a header might look like:
Authorization: Basic ZGVlejpudXRzWhere “ZGVlejpudXRz” is the encoded username:password string. Of course, this authentication is completely insecure over unencrypted connections, as the base64 string can be read and decoded by anybody. That’s why application passwords are, by default, disabled on all WordPress websites that don’t use SSL.
The username is obviously the username of the account you want to authenticate (the same used with /wp-login.php). The password is the application password generated for that account. You can’t use your main account password you use on /wp-login.php – the basic auth method works only with application passwords.
An important detail is that this form of authentication sets the user up the exact same way a cookie-based authentication does. This means that you can still call current_user_can() and all the other user-related functions. You don’t have to know which authentication method was used. For a command-line request with curl, authentication is as simple as:
curl --user "USERNAME:PASSWORD" https://example.com/wp-json/wp/v2/users?context=editOther Authentication Methods
The two aforementioned authentication methods are the only methods supported in the core. There are, however, many plugins that add additional methods, such as JSON Web Tokens, OAuth 2.0, API keys, and more.
Custom Endpoints (Code Example)
Core endpoints are useful, but the real power of the REST API is in creating your own endpoints. We’ll extend our Read Later plugin to expose endpoints allowing the user to get a full list of all post IDs in their list, as well as find out if an individual post is saved or not. This code example is just a demonstration. Read the Extending the REST API documentation to learn more details.
You already know that registering endpoints should happen on the “rest_api_init” hook. What you don’t know is that there’s a helper function you use to do it – register_rest_route(). In our case, we’ll have to create a few new methods in our Rltr_Read_Later class. Let’s start by registering the endpoint returning a list of all saved posts:
public function rest_register_routes() {
    register_rest_route( 'rltr/v1', '/saved', [
        'methods' => WP_REST_Server::READABLE, // this is just "GET"
        'callback' => [ $this, 'rest_get_saved' ],
        'permission_callback' => 'is_user_logged_in'
    ] );
}

public function rest_get_saved() {
    return $this->read_later_posts;
}

// ... down in rltr_setup()
add_action( 'rest_api_init', [ $rltr_read_later, 'rest_register_routes' ] );That’s it. If you now went to https://example.com/wp-json/rltr/v1/saved?_wpnonce={nonce}, you’d see a list of all post IDs you have in your list, like: [“1″,”3″,”7”]. Let’s go through this code step by step. The first argument to register_rest_route() is the namespace. For us, it’s “rltr/v1”. The general best practice is slug/version (if you ever introduced breaking changes to the API, you could increment the version).
The second argument is the route. The third argument is an array of args. The WP_REST_Server::READABLE constant is equal to “GET” – it’s just more API native to use the constants. There are other constants like:
- CREATABLE – POST,
- EDITABLE – POST, PUT, PATCH,
- DELETABLE – DELETE,
- ALLMETHODS – GET, POST, PUT, PATCH, DELETE.
‘callback’ is the main callback (handler) for the API. For us, it’s the method that returns the array of post IDs in the list. ‘permission_callback’ is the callback we talked about extensively in the Authentication section. Notice that we’re passing “is_user_logged_in”. This function will return false if the request is anonymous. That’s why we had to manually use the _wpnonce query parameter in the URL – otherwise, the cookie-based authentication wouldn’t work. You should use “__return_true” if you want your endpoint to accept anonymous requests.
That was a very basic endpoint. Let’s now add the more interesting one – checking if a post is saved or not by ID:
public function rest_register_routes() {
    // [...]
    register_rest_route( 'rltr/v1', '/saved/(?P<id>[\d]+)', [
        [
            'methods' => WP_REST_Server::READABLE,
            'callback' => [ $this, 'rest_get_saved_single' ],
            'permission_callback' => 'is_user_logged_in',
            'args' => [
                'id' => [
                    'required' => true,
                    'description' => __( 'The ID of the post', 'read-later' ),
                    'type' => 'integer',
                    'validate_callback' => [$this, 'rest_get_saved_single_validate'],
                    'sanitize_callback' => 'absint'
                ]
            ]
        ]
    ] );
}

public function rest_get_saved_single_validate( $value ) {
    if ( ! is_numeric( $value ) ) {
        return new WP_Error( 'rltr_invalid_arg', __( 'ID must be numeric.', 'read-later' ), [ 'status' => 400 ] );
    }

    if ( get_post_type( $value ) !== 'post' ) {
        $error_message = sprintf( __( "Post with ID %d doesn't exist or isn't a 'post'.", 'read-later' ), $value );
        return new WP_Error('rltr_post_not_found', $error_message, ['status' => 404]);
    }

    return true;
}

// Assumes $request['id'] is a number and a post with this ID exists.
public function rest_get_saved_single( WP_REST_Request $request ) {
    $is_saved = in_array( $request['id'], $this->read_later_posts );
    return [ 'is_saved' => $is_saved ];
}This one is a little more advanced. First of all – look at the route. We’re using regex to accept any positive integer after /saved/. We are also storing said integer as “id”, which will then be passed and stored as an argument in the WP_REST_Request object.
There’s a new entry in the array of options – “args”. This is an array of associative arrays, where the keys are the names of arguments passed along with the request (such as our “id”). We’re basically defining its schema: whether or not it’s required, its description, and its type. There are also two extremely important parameters: validate_callback and sanitize_callback.
validate_callback runs first. Its job is to validate the argument and return an error (or false) if the data is not valid. This will kill the execution before the main callback is ever called. Look at our rest_get_saved_single_validate() method. We’re returning an error if the ID is not numeric or if it’s not the ID of a post.
sanitize_callback is exactly what you think. It runs after validate_callback. Its job is to sanitize the data before the main callback is executed. In this case, we’re running our ID through absint.
By the way, be careful with what functions you use directly in these callbacks. They pass 3 parameters – $value, $request (current WP_REST_Request), and $key (“id” in our case). Some built-in PHP functions throw fatal errors if you pass them more arguments than they expect. One such example is is_numeric(), which is a very enticing function for validate_callback. In such a case, you’d have to wrap it in an anonymous function.
You can use functions like absint() without any problems, which is what we’re doing with sanitize_callback. I’m not 100% sure why, but I think it has something to do with built-in PHP functions being written in C (and therefore being more strict), while userland functions are more lenient and automatically discard unused parameters. See ticket 34659 for a discussion on this topic (spoiler: it’s dead).
Going back to the code example, we can see that our main callback is very simple – it checks if the passed ID is present in the list of all saved posts and returns a boolean value with the “is_saved” key. We don’t have to do any validation or sanitization inside of this method as it has already been done by the specific callbacks. By the way, you can treat the WP_REST_Request object like an array because it implements the Array Access interface.
Here’s an example response for https://example.com/wp-json/rltr/v1/saved/1?_wpnonce={nonce}:
{"is_saved":true}And here’s one for https://example.com/wp-json/rltr/v1/saved/420?_wpnonce={nonce}:
{
  "code": "rest_invalid_param",
  "message": "Invalid parameter(s): id",
  "data": {
    "status": 400,
    "params": {
      "id": "Post with ID 420 doesn't exist or isn't a 'post'."
    },
    "details": {
      "id": {
        "code": "rltr_post_not_found",
        "message": "Post with ID 420 doesn't exist or isn't a 'post'.",
        "data": {
          "status": 404
        }
      }
    }
  }
}Why The Previous Example Is Wrong
You read that right. The code example you just saw is theoretically wrong. It’s not wrong wrong – if you navigate to the registered endpoints, you will get the data you expect. It’s just that it doesn’t really respect the REST architecture, which is something that might’ve been bugging you if you know a thing or two about REST.
A REST route should point to a resource. A noun – something you can touch (figuratively). A list of saved posts of a user isn’t really a resource. It’s a property of a resource – the user. That’s consistent with the fact that we are storing this data as the user’s metadata (in wp_usermeta).
This fact is actually very important. Because it’s a property of a user, it should be available in the user resource. Guess what? It is. Or at least – it can be. The Modifying Responses documentation explains how to make metadata of an object (e.g., post, user, and other objects with _postmeta tables) become available in REST API responses. The trick is registering the metadata key with register_meta(). Let’s add this code to our Rltr_Read_Later constructor:
register_meta( 'user', 'rltr_read_later', [
    'type' => 'integer',
    'single' => false,
    'show_in_rest' => true,
] );I’ve already mentioned the register_meta() function in the past, but it was a long time ago. It was a prerequisite for using metadata with the Block Bindings API and having metadata revisioned. Anyway, if we add this piece of code, the response of GET /wp/v2/users/me?_wpnonce={none} will be something like:
{
  "id": 2,
  "name": "Admin nicename",
  // [...] truncated for brevity
  "meta": {
    "rltr_read_later": [1, 3, 7]
  },
  // [...] truncated for brevity
}Let’s be honest – the endpoint for checking if a single post is saved or not is pragmatically useless. Just get the list of all saved posts and check if your ID is in the array. It was for demonstration purposes only. That is the canonically correct way to implement support for the REST API.
PS: The “Modifying Responses” documentation also talks about register_rest_field(). It’s a function allowing you to add/modify fields in responses of existing REST API endpoints. It’s pretty advanced and niche so I’m not going to explain it here.
Controller Classes
Our example was simple. That’s why we could hack together a working solution with a few methods. Now imagine doing that with an ecommerce plugin. If you didn’t spend some serious time thinking about how to structure and name your callbacks, it would quickly become a hell to maintain.
Thankfully, you don’t have to do that all by yourself. WordPress comes with an abstract WP_REST_Controller class. All controllers handling core wp/v2 routes (posts, users, etc.) extend this class. It contains a number of useful methods all core APIs support, such as get_fields_for_response(), get_context_param(), and more.
But that class doesn’t solve the structure problem by itself. If you want your code to be easy to maintain, you should follow patterns set by the core. The best way to learn them is by reading the code. All core controller classes have very similar methods: register_routes(), get_items(), get_item(), get_item_permissions_check(), etc.
The point is – the code responsible for handling REST API endpoints is not trivial. If you’re writing an advanced plugin, you should seriously consider its structure. The use of controller classes following the same patterns as the core will likely make it a much more pleasant experience. Read more about them in the official Controller Classes documentation.
Custom Post Types In The REST API
Remember the custom post type “thm_book” we created a while ago? We can expose it in the REST API. All we have to do is pass ‘show_in_rest’ => true in args. It will use the same controller as the core posts endpoint. You can do the exact same thing with custom taxonomies, like our “thm_genre” taxonomy. Read the docs for more information.
Headless WordPress
A typical website is usually divided into two parts – body and head. Body is the backend, while head is the frontend. The concept of a headless CMS is not new. There are many headless CMSes on the market. They provide you with a backend for creating your content and expose it via APIs. You are then only responsible for creating the frontend by reading this content.
That’s exactly what headless WordPress is. It’s a WordPress setup where WordPress doesn’t render any HTML. The theme layer never runs. You use WordPress only for creating and storing posts (and other content) and your frontend is a separate application – usually using a modern JS framework like React, Vue, Svelte, etc. The content writers still log into /wp-admin, but the requests from users don’t load the WordPress templating system.
The REST API is what makes this possible (although GraphQL can be used with a plugin). All the data on your site is available in the API. Remember when I talked about decoupling WordPress from WordPress? That’s exactly what I meant – treating WordPress as only the backend.
Headless WordPress is a rather advanced architecture and you won’t see it used often (nor should you). The data is either fetched from the API on the frontend (using Client-Side Rendering, usually with Single Page Applications) or a static HTML file is pre-generated (Server-Site Rendering with Static Site Generation).
Pros
- Frontend freedom – you are not tied to the WordPress way of creating frontend (particularly PHP templates). You can potentially use more modern practices and frameworks without having to fight the system.
- Omnichannel publishing – the same WordPress backend can be used to power your website, mobile app, desktop app, etc.
- Scalability – in big organizations, separate dev teams can work on the backend and on the frontend.
- Security – the presentation layer is completely detached from the backend, /wp-admin isn’t on the same domain, and the number of plugins is much lower, usually reducing the number of attack vectors. This doesn’t reduce the importance of keeping WordPress secured.
Cons
- Complexity – you are now creating and maintaining two separate applications – your JS frontend and your WordPress backend. This means two deploy pipelines, two hosting environments, etc.
- Loss of themes and plugins – most plugins are not headless-compatible. They interact with the presentation layer, often enqueueing scripts or filtering the_content (like our plugins did). You will have to write most of the custom backend functionality yourself.
- More dev work (and costs) – referring to the previous point, more functionality to write means more dev work, time, and budget needed to ship the project. You often have to reinvent things that would be easy to implement in WordPress.
- Degraded editor experience – you lose the live preview, the customizer, WYSIWYG editing, etc. (the theme is no longer what the frontend actually looks like).
- SEO challenges – if using Client-Side Rendering.
Overall, headless WordPress is an overkill for 99.9% of projects. Don’t blindly fall for claims that it will make your site blazingly fast. This claim is based on the assumption that the site will be generated on the server and a static HTML file will be served. The problem is – you can do that with WordPress and page caching. In practice, speed isn’t a deciding factor.
What is a deciding factor is the project’s scope. If you’re creating a complex web application with cutting-edge custom frontend requirements and a large team of developers, you might want to seriously consider going headless (or just not using WordPress at all). Otherwise, it’s a waste of resources, especially since modern WordPress with Block Themes has really been closing the gap between modern web development (think back to the Interactivity API).