Every sufficiently large plugin needs to provide the user with some level of control. For demonstration purposes, we’ll create a settings page for our plugin allowing the user to specify a different string for the “Reading time” text.
Options API
The Options API is the layer between you and the wp_options database table. All settings should be stored in that table. As a matter of fact, we’ve already used this API indirectly when we covered the Customizer. Our settings were stored in the options table and the Customizer API uses the Options API to manage them.
The API is stupidly simple. It consists of only 4 main functions providing the CRUD functionality:
- add_option( $option, $value )
- update_option( $option, $value )
- get_option( $option, $default_value )
- delete_option( $option )
In reality, you’d usually use update_option() instead of add_option(), as it creates the option automatically if it doesn’t yet exist (just like update_post_meta() does). Values can be either single values or arrays, which will be serialized. If you have many options, it’s usually better to store them as an array, as that reduces the number of rows in the database.
There’s also another parameter you can pass to the add and update functions that I didn’t include – $autoload. It’s a boolean parameter. If it’s true, the option will be preloaded by WordPress while it’s booting up. It will then be cached in memory.
Why? Imagine you had 15 different options. If you didn’t autoload them, every get_option() call would make a separate SELECT query. By the time your plugin was done, you would’ve made 15 database queries. Now multiply that by 20 plugins installed on the website. With autoloading, WordPress makes only one query to fetch all autoloaded options. All subsequent get_option() calls for any of these options are served from in-memory cache.
It’s a balancing game, as the option will be loaded on every page, even if it isn’t used – slowing down the entire website. You should use autoload if your code fetching the options runs on many requests, especially on the frontend. If your options are only used on a few rarely visited URLs, autoloading will probably do more harm than good.
PS: If you visit the /wp-admin/options.php page, you can see all of your options stored in the wp_options table.
Settings API
The Settings API is a standard WordPress way of creating the frontend in wp-admin for modifying your options. It lets you create settings, fields for those settings, and sections for those fields. Every section gets rendered on a settings page, which is covered in “Administration Menus”.
There are 3 main functions for creating settings (arguments not shown):
- register_setting() – registers a new option with the supplied name.
- add_settings_field() – registers a field to be displayed. A callback is responsible for outputting the HTML of the field (i.e., an <input> element). The input’s ‘name’ attribute must match the name of the option registered with register_setting(). The field gets connected with a specified section.
- add_settings_section() – registers a settings section. The section gets connected with a specified page.
Similarly, there are 3 main functions for displaying settings (arguments not shown):
- settings_fields() – renders required hidden utility and security fields.
- do_settings_fields() – renders settings fields for a given section (not usually used directly).
- do_settings_sections() – renders all settings sections connected with the specified page. Uses do_settings_fields() internally.
It’s important to know that you don’t have to use the Settings API. You can just as well create the entire page yourself. There are, however, significant benefits from using the API:
- Robustness – think back to the list of best practices. You want to use the built-in API. Not only is it better tested and safer; it will also change as WordPress changes, and your code will not.
- Visual consistency – your fields and other elements will be styled the same way all of the other core elements are. This improves visual consistency throughout the entire admin panel.
- Less work – if you were to create a custom settings page, you’d have to handle form submissions and implement all of the security measures that come with that. Not to mention the fact that you would just have to write a lot more code.
I know this is a pretty heavy theory, and it’s fine if you don’t fully understand it yet. Hopefully it’ll all click once you see the code example.
PS: register_setting() doesn’t provide any way of enabling or disabling autoload for the option. It gets registered with a value of ‘auto’. If you need to deliberately set autoload, you would have to add the option yourself using add_option(), usually during plugin activation. Even if you do that, you’d still have to register it as a setting using register_setting(), but it won’t add the option to the database since it already exists.
PS 2: You can also display errors to users with functions like add_settings_error(), but I deemed it not important enough to include in this section. Go read the documentation.
Administration Menus
Administration menus are the panels on the left side of the admin dashboard. There are 2 types of them – top-level menus and sub-menus.
Top-level menus are the ones you always see. These are ‘Posts’, ‘Pages’, ‘Appearance, Plugins, etc. To add a top-level menu, you have to call the add_menu_page() function. You need to supply a callback responsible for rendering the page, usually with some boilerplate HTML and by calling methods like settings_fields() and do_settings_sections().
Sub-menus are menus nested under top-level menus. They only show up when the user is in the top-level menu or hovers over it. To add a sub-menu, you have to call the add_submenu_page() function. You need to specify the parent top-level menu and, once again, create a callback responsible for rendering the page’s HTML.
There is an exhaustive list of helper functions you can use instead of add_submenu_page() to register a sub-menu for the built-in top-level menus. These are just simple wrappers over the core function with a hard-coded top-level menu identifier. Here they are:
- add_dashboard_page()
- add_posts_page()
- add_media_page()
- add_pages_page()
- add_comments_page()
- add_theme_page()
- add_plugins_page()
- add_users_page()
- add_management_page()
- add_options_page()
The general rule is to not create a top-level menu unless your plugin is big and actually requires multiple sub-menus. That’s to not clutter the UI. I don’t know if I fully agree with that. Sometimes it’s a better user experience to see the menu in the sidebar than having to scour the entire admin panel to find it. I’m probably wrong though, so do as you see fit.
On a side note, you don’t actually have to add a menu page to display your fields. You can connect your section to a page that already exists, or even connect your fields to a section that already exists. This is, in my opinion, terrible UX. I’d personally almost never hide my settings in between other core settings.
Settings Page (Code Example)
Let’s start with registering the settings:
// Optional callback function executed at the top of the section
function pgn_text_section_html() {
    echo '<p>Settings related to text</p>';
}

// Callback function rendering the field's input element
function pgn_reading_time_text_html() {
    $current = get_option( 'pgn_reading_time_text' ); // We have to display the current value
    echo '<input type="text" name="pgn_reading_time_text" value="' . $current . '">';
}

function pgn_settings_init() {
    // First is $option_group, second is $option_name (the one stored in the database)
    register_setting( 'pgn_post_reading_time_group', 'pgn_reading_time_text' );

    add_settings_section(
        'pgn_text_section',         // $id - unique ID of the section
        'Text Settings',            // $title - displayed as heading
        'pgn_text_section_html',    // $callback
        'pgn_post_reading_time_menu'// $page - slug of our menu page
    );

    add_settings_field(
        'pgn_reading_time_text',              // $id
        'Text alternative to "Reading time"', // $title - label
        'pgn_reading_time_text_html',         // $callback
        'pgn_post_reading_time_menu',         // $page
        'pgn_text_section'                    // $section
    );
}
add_action( 'admin_init', 'pgn_settings_init' );Before we create the sub-menu, let’s stop and discuss what’s going on here. The $option_group parameter passed to register_setting() is a particularly interesting thing. It’s like an ID for a group of settings. Every setting has to be in a group, and all of the settings displayed on one page are supposed to be in the same group.
As far as I know, it’s mostly used as a security mechanism. $option_group is a hidden field included in the form element. WordPress checks its value and only updates options sent in the POST request if they have been registered for this group. This prevents options from being updated by forms that aren’t supposed to update them.
Other than that, you can see that we register the setting, add its field, connect it with a section, and connect the section (and the field) with a page. A page we are going to add right now:
// Callback function rendering the contents of the page
function pgn_settings_page_html() {
    ?>
    <div class="wrap">
        <h1><?php echo get_admin_page_title(); ?></h1>
        <form action="options.php" method="post">
            <?php
            settings_fields( 'pgn_post_reading_time_group' );
            do_settings_sections( 'pgn_post_reading_time_menu' );
            submit_button();
            ?>
        </form>
    </div>
    <?php
}

function pgn_settings_page_init() {
    add_options_page(
        'Post Reading Time Settings', // $page_title - displayed in <title>
        'Post Reading Time',          // $menu_title
        'manage_options',             // $capability - don't worry about that now
        'pgn_post_reading_time_menu', // $menu_slug - slug & unique ID
        'pgn_settings_page_html'      // $callback
    );
}
add_action( 'admin_menu', 'pgn_settings_page_init' );As you can see, we only have to write a very tiny amount of boilerplate HTML. That’s because the Settings API is doing the heavy lifting. The docs recommend you add the div with a wrap class, but they don’t explain why.
The action of the form is set to options.php. This is the core file that handles the form submit and option updates. It’s where the magic of the API happens. settings_fields() renders the hidden fields, including the aforementioned field with the ‘pgn_post_reading_time_group’ option group name.
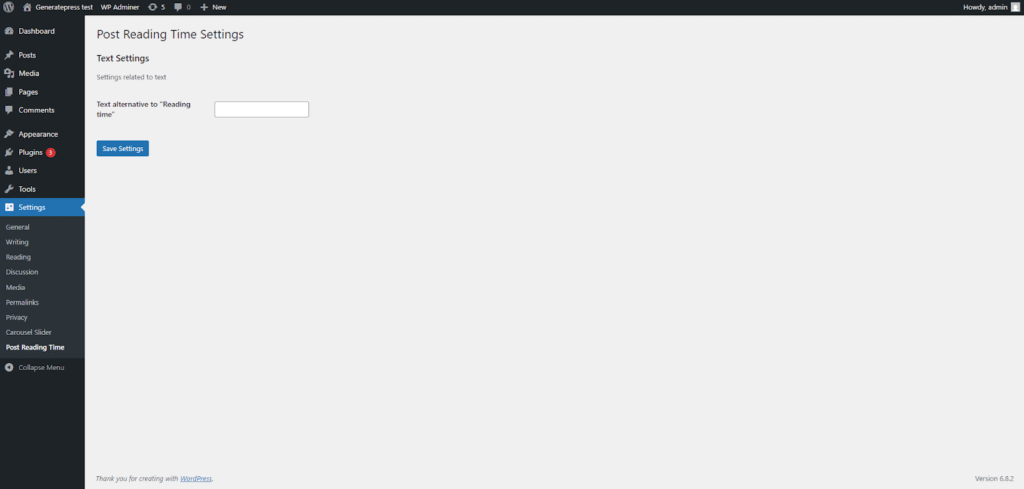
You can see we registered the sub-menu using the helper function add_options_page(). I just think it’s more self-documenting and makes the code prettier. Here is what the final page looks like:
Updated Plugin (Code Example)
We have the option in the wp_options table. We have created a page for the user to modify it. It’s time to use it in the code. Here’s our new snippet function:
function pgn_add_snippet_to_post_content( $content ) {
    if ( ! is_single() || ! is_main_query() || ! in_the_loop() ) {
        return $content;
    }

    $reading_time_text = get_option( 'pgn_reading_time_text' );
    if ( empty( $reading_time_text ) ) {
        $reading_time_text = 'Reading time'; // Default
    }

    $reading_time = pgn_calculate_reading_time( $content );
    $display_html = '<div class="pgn-reading-time">' . $reading_time_text . ': ' . $reading_time . ' min</div>';

    return $display_html . $content;
}Now your users can freely change the text displayed on their websites. Success.