AJAX stands for Asynchronous JavaScript And XML. AJAX is generally a pretty major point of confusion. First and foremost – it is not anything specific to WordPress. Let’s talk about it more broadly first and then we’ll cover WordPress’s implementation.
I will start with what it’s not. It is not a protocol, not an API, not a library, not a framework, and not any specific technology. AJAX is a set of techniques used to make a website update its content without a full page reload by asynchronous communication with the backend. That’s it.
Whenever you have JavaScript on the frontend that sends a request to an endpoint and updates the DOM using the response content – that’s AJAX. Most modern websites and web development frameworks use AJAX extensively. Client-Side Rendering and Single Page Applications are all AJAX.
Adding a product to cart without a page reload? AJAX. Autocompletion in Google’s search bar? AJAX. Infinite scroll? AJAX. AJAX is everywhere, especially as web development progresses, because it improves the user experience.
Remember – it’s just an abstract categorization term for an infinite amount of implementations. You may ask “how does it differ from a REST API?”. Well, a REST API (or any other backend API) is a part of AJAX. It’s the concrete thing that allows the client to communicate with the server, therefore allowing for AJAX to be used.
The X (for XML) is a legacy quirk. Back when AJAX was being developed (1999), XML was the standard format for sharing data between applications. Nowadays, most AJAX implementations rely on JSON (as most APIs use it).
admin-ajax.php
Most WordPress developers do not know the definition of AJAX. They confuse it with a specific implementation that’s been in WordPress since 2006 – the admin-ajax.php file. This is what they usually think about when they say “use AJAX”. I will refer to that implementation as “admin-ajax”.
The admin-ajax.php file predates the REST API (which we will cover soon) by 10 years. For a long time, it was the only way (besides custom endpoints and using XML-RPC) to implement AJAX on WordPress websites. It’s just one file in the wp-admin directory (the endpoint is /wp-admin/admin-ajax.php). It’s the front controller for this implementation.
This file is surprisingly simple. It really boils down to 3 things:
- Loading the core of WordPress (wp-load.php).
- Checking for an action in the GET/POST data, i.e., $action = $_REQUEST[‘action’].
- Calling either do_action(“wp_ajax_{$action}”) or do_action(“wp_ajax_nopriv_{$action}”), depending on if the user is logged in or not.
That’s how this system works. You send a request in JavaScript to /wp-admin/admin-ajax.php with (at least) one argument – “action”. This argument is just a string that you define as the name of your action. Then, WordPress calls do_action() for “wp_ajax_{$action}” if the user is logged in, or for “wp_ajax_nopriv_{$action”}” if the user is not logged in. Your job is to hook a handler callback to one or both of these actions, and to write and enqueue a JS script that makes the request on the client side.
Notice that all requests using admin-ajax are made to the same endpoint. The difference is only visible in the payload (the “action”). Therefore, if you installed a lot of plugins which utilize this API and opened the devtools network tab, you’d see a lot of seemingly similar requests, but they would all be used for widely different things.
Remember that for actions that do something (instead of only fetching data), you should use nonces to prevent CSRF. You should also not hard-code the /wp-admin/admin-ajax.php endpoint into your code unless you want your code to break all WordPress installations running not from the root directory or with a renamed wp-admin folder. You’ll see those principles in the example below.
Code Example
For this example, we’ll develop a completely new plugin. This plugin will not only use admin-ajax, but will also utilize other concepts we’ve discussed in the last few chapters, such as user accounts, security, and internationalization. It will also follow the more modern single-class architecture. It will follow plugin development best practices (in contrast to our Post Reading Time plugin).
The plugin I’m talking about is a “Read Later” plugin. It will add a “Read this later” button to all blog posts. The user will be able to click this button and the post will be saved to their TO-READ list.
Here’s the specification:
- Display a “Read this later” button at the top of post content for logged-in users.
- Allow the user to add (or delete) a post to their list without reloading the page (AJAX).
- Store the list as user metadata (in wp_usermeta).
For now, that’s all. We will not display the user’s list in any way. You can expand that if you want, but that’s enough for demonstration purposes. I will also not style the button, as CSS is not the subject of this guide.
Let’s start with the foundation – the class definition and the constructor:
<?php
/*
* Plugin Name: Read Later List
*/

if ( !defined( 'ABSPATH' ) ) exit;

class Rltr_Read_Later {
    private int $user_id;
    private array $read_later_posts;

    public function __construct( int $user_id ) {
        // User is logged-out, get_user_meta() will return false.
        if ( $user_id <= 0) {
            $this->user_id = 0;
            $this->read_later_posts = [];
            return;
        }

        $this->user_id = $user_id;
        $this->read_later_posts = get_user_meta( $this->user_id, 'rltr_read_later');
    }
}Nothing fancy here. Passing the user ID in the constructor is a good practice to make the class testable. We’re storing the IDs of marked posts with an “rltr_read_later” meta key in the wp_usermeta table. It’s not one entry with a serialized array – it’s multiple entries with the same key (hence the third argument, “single”, is left as default [false]). It’s just a choice I made.
The rendering method:
// Hooked to the the_content filter.
public function add_read_later_button( $content ) {
    if ( !is_singular( 'post' ) || !in_the_loop() || !is_main_query() || !is_user_logged_in() ) {
        return $content;
    }
    // Only show the button for logged-in users.
    if ( $this->user_id <= 0) {
        return $content;
    }

    $post_id = get_the_ID();

    // Check if the current post is already in the list to set the initial state.
    $is_saved = in_array( $post_id, $this->read_later_posts );
    $text = $is_saved
        ? __( 'Saved for later', 'read-later' )
        : __( 'Read this later', 'read-later' );

    $button_html = '<div><button class="rltr-read-later-button" data-post-id="' . esc_attr( $post_id ) . '">' . esc_html( $text ) . '</button></div>';

    return $button_html . $content;
}This method adds the toggle button right at the top of the post content. We’re only showing it for single posts of type “post” and for logged in users. If the post is already saved, the button’s content will be “Saved for later”. Note the ‘data-post-id’ attribute. We’ll use it in our JavaScript to pass the post ID in the admin-ajax request.
The backend admin-ajax handler:
// Hooked to the wp_ajax_rltr-toggle-read-later action.
public function ajax_toggle_read_later() {
    if ( !isset( $_POST[ 'post_id' ] ) || !is_numeric( $_POST[ 'post_id' ] ) ) {
        wp_send_json_error( 'post_id not set or not numeric.' );
    }
    $post_id = absint( $_POST[ 'post_id' ] );

    // This will check if the post exists and if it's of the supported post type.
    if ( get_post_type( $post_id ) !== 'post' ) {
        wp_send_json_error( "Post doesn't exist or its post type isn't 'post'" );
    }

    check_ajax_referer( "rltr-toggle-read-later-$post_id" );

    // Toggle the user meta.
    if ( in_array( $post_id, $this->read_later_posts ) ) {
        delete_user_meta( $this->user_id, 'rltr_read_later', $post_id );
        $status = 'removed';
    } else {
        add_user_meta( $this->user_id, 'rltr_read_later', $post_id );
        $status = 'added';
    }

    // Calls wp_die().
    wp_send_json_success( [ 'status' => $status ] );
}Here comes the star of this chapter – the AJAX handler. Notice that we’re utilizing validation (the security technique) twice at the top. First, we’re checking if post_id is numeric – that’s format detection. Then, we’re checking if it’s the ID of an actual post – that’s a safelist. The next major security step is checking the nonce. We’re only checking after and not before processing post_id because we need it for the nonce action.
Then, we either delete or add the post ID to the user’s list, depending on if it’s already in it (aka, toggle). wp_send_json_success() sends the response as JSON, but you could’ve just as well sent XML or even plain text (just remember to call wp_die(), otherwise your response will have a “0” appended at the end, which will break its structure).
admin-ajax handler for logged-out users:
// Hooked to the wp_ajax_nopriv_rltr-toogle-read-later-action.
public function ajax_handle_logged_out() {
    wp_send_json_error( 'You must be logged in to use this feature.' );
}And here’s the handler for the anonymous hook. This should never run for normal visitors, as the button is not rendered on the frontend for logged-out users.
Enqueue:
public function enqueue_scripts() {
    // Only load these scripts on single post pages.
    if ( !is_singular( 'post' ) ) {
        return;
    }

    wp_enqueue_script(
        'rltr-read-later-script',
        plugins_url( 'script.js', __FILE__ ),
        [],
        filemtime( plugin_dir_path( __FILE__ ) . 'script.js' ),
        true
    );

    $data_to_pass = [
        'ajax_url' => admin_url( 'admin-ajax.php' ),
        'nonce'=> wp_create_nonce( 'rltr-toggle-read-later-' . get_the_ID() ),
    ];
    // wp_json_encode ensures the data is safely converted to a JSON string.
    $inline_script = sprintf( "const rltr_ajax_obj = %s;", wp_json_encode($data_to_pass) );
    wp_add_inline_script( 'rltr-read-later-script', $inline_script, 'before' );
}And finally, a method used to enqueue our script file. Notice that we’re passing the data from PHP to JavaScript using wp_add_inline_script() (which, as I already noted, is the correct function to do that). We’re getting the admin-ajax URL using admin_url() and creating and passing a new nonce with the same action name as we’re checking in the AJAX handler.
Setup (in the PHP file after the class definition):
function rltr_setup() {
    $rltr_read_later = new Rltr_Read_Later( get_current_user_id() );

    add_filter( 'the_content', [$rltr_read_later, 'add_read_later_button'] );
    add_action( 'wp_ajax_rltr-toggle-read-later', [$rltr_read_later, 'ajax_toggle_read_later'] );
    add_action( 'wp_ajax_nopriv_rltr-toggle-read-later', [$rltr_read_later, 'ajax_handle_logged_out'] );
    add_action( 'wp_enqueue_scripts', [$rltr_read_later, 'enqueue_scripts'] );
}
// Has to be on init because that's when the user is loaded.
// Doing setup when plugins are loaded wouldn't work because the user ID would always be 0.
add_action( 'init', 'rltr_setup' );Here’s how we initialize the Rltr_Read_Later object and hook all the methods.
script.js:
document.addEventListener('click', function(e) {
    // Use event delegation to catch clicks on our button.
    if (!e.target.matches('.rltr-read-later-button')) {
        return;
    }

    const button = e.target;
    const postId = button.dataset.postId;

    // Prepare the data to send.
    const formData = new FormData();
    formData.append('action', 'rltr-toggle-read-later');
    formData.append('_ajax_nonce', rltr_ajax_obj.nonce); // Nonce from inline script.
    formData.append('post_id', postId);

    // Disable the button to prevent multiple clicks.
    button.disabled = true;

    fetch(rltr_ajax_obj.ajax_url, { // URL from inline script.
        method: 'POST',
        body: formData
    })
        .then(response => response.json())
        .then(result => {
            if (result.success) {
                // Update button text and style based on the response from the server.
                if (result.data.status === 'added') {
                    button.textContent = 'Saved for later';
                } else {
                    button.textContent = 'Read this later';
                }
            } else {
                // If the request fails, show the error in the console.
                console.error('Error: ' + result.data);
                alert('Something went wrong. Please try again.');
            }
        })
        .catch(error => console.error('Network Error: ', error))
        .finally(() => {
            // Re-enable the button after the request is complete.
            button.disabled = false;
        });
});Finally, the JavaScript. We’re listening for all clicks of our button. When a click happens, we read the post ID from the data attribute and make a request using the Fetch API (you could’ve just as well used jQuery or the legacy XMLHttpRequest).
The request is a POST request with fields: “action” ($action in “admin_ajax_$action” hooks), “_ajax_nonce” (read from the passed inline JS), and “post_id”. If the request succeeds, we change the button’s content depending on whether the post was added to the list or deleted from it.
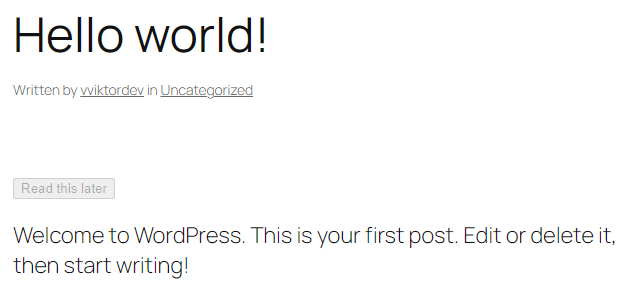
I would love to be able to embed a video here, but I’m writing it as a PDF and I’m not going to spend an hour trying to make that work. Here are three frames from using this feature.
Before clicking the button:

Right after clicking the button (you could add some loading animation here, I just disabled the button):
After receiving a successful response from the server:
