The Customizer allows you to customize options for classic themes. Its most powerful feature is live preview. Any change you make is displayed before you save it. That means you can change the logo, the colors, the layout, or the typography, and you will be able to preview the changes before publishing them. Options available for customization are defined by the theme author.
The Customizer is based on the Customize API. This is an object-oriented API you have to interact with in order to display options for users to change in your theme. In practice, that means adding an object to the WP_Customize_Manager object.
The Customizer is composed of 4 types of objects:
- Settings
- Controls
- Sections
- Panels
Settings
A setting is an object that represents a single piece of data you want to manage. It’s the link between the user interface (the control) and the database. Think of it this way – if you want to let your users choose the number of posts displayed on a particular page, you have to register a setting – let’s call it posts_displayed. That creates a WP_Customize_Setting object with this name as its ID.This object has all the necessary methods for saving the data in the database. Your job is only to register the setting. The WP_Customize_Manager takes care of calling all methods.
Settings have 4 primary responsibilities:
- Defining the data container and its default value.
- Handling data storage and retrieval.
- Sanitizing data.
- Handling live preview (more on that later).
When adding a setting, you’re faced with the choice of its type. There are 2 setting types: ‘theme_mod’ and ‘option’.
theme_mod is a setting specific to the current theme. If the user changes the theme, the setting becomes dormant (it doesn’t get deleted but it can’t be used in a different theme). theme_mod settings are stored in the wp_options table in the database as a serialized array of all settings for this specific theme.
option is a global setting supposed to be theme-agnostic. Settings of this type should rarely if ever be added by a theme. They are stored in the database as separate rows for every setting. These settings work exactly the same as normal WordPress options you can modify in Settings (site URL, blog name, etc.), except they are used in the Customizer interface. As a matter of fact, you can change settings such as the blog name in the Customizer. The benefit over the classic Settings menu is live preview.
Controls
A control is the UI element responsible for changing the setting in the Customizer. Every control object has to have an associated setting and an associated section. The most important argument when adding a control is its type. There are many different types, such as all types of HTML <input> elements, checkbox, textarea, radio, select, and dropdown-pages. You can also create your own controls by subclassing the WP_Customize_Control class. A type ‘number’ would be used for our posts_displayed setting. That would render <input type=”number”> in the Customizer.
Sections
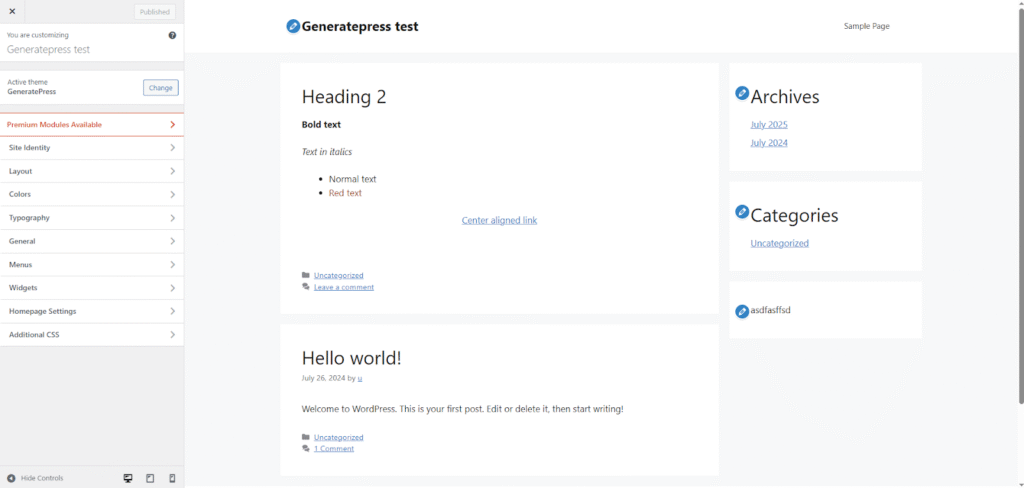
A section is just a UI container for controls. You can see many sections in the screenshot above: Site Identity, Colors, Typography, General, Homepage Settings, and Additional CSS. A section must contain at least 1 control to be displayed.
Panels
A panel is a UI container for sections. It’s not required. If you find yourself thinking “I wish I could group sections” when designing your options, then you should use a panel. It’s usually not needed. There are 3 panels in the screenshot above: Layout, Menus, and Widgets.
Originally, panels were supposed to be more than that. The documentation states: “More than simply grouping sections of controls, panels are designed to provide distinct contexts for the Customizer, such as Customizing Widgets, Menus, or perhaps in the future, editing posts”. You can see that in practice by navigating to the Widgets panel. It doesn’t display a simple list of options like sections do. It displays a list of all registered sidebars and allows you to modify the widgets inside. The full potential of panels (e.g., “editing posts”) was never realised, perhaps because it got superseded by Full Site Editing with the Block Editor.
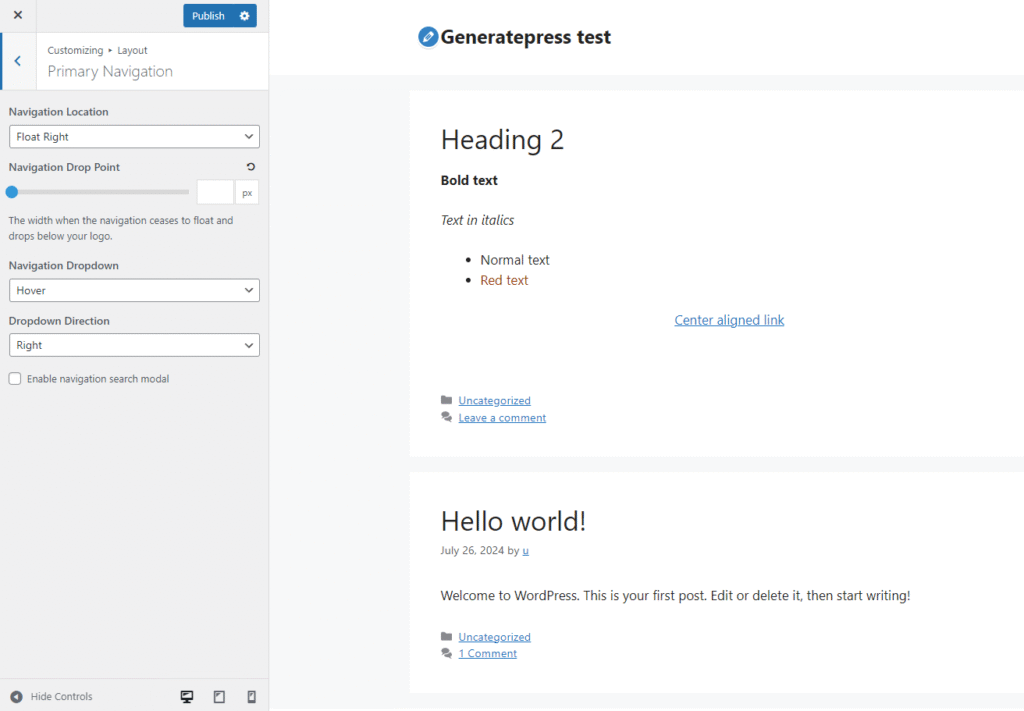
The screenshot above shows all of the ideas. You can see at the very top, we are in the Layout panel (written next to “Customizing”). We are in the Primary Navigation section. This section displays multiple controls with different types. These controls are connected to theme_mod settings that affect the appearance of the active theme, GeneratePress. All of that has been registered by the theme.
Live Preview
As already noted, a setting defines the live preview mode used to update it in the Customizer. This mode affects the preview’s behavior. There are 3 options: refresh, postMessage, and selective refresh.
refresh is the default mode. If it is used, the entire preview <iframe> gets refreshed on every change to the setting. This means a new request to the server and re-rendering the entire page. It’s easy for the developer as it doesn’t require any additional code, but it provides a bad user experience for the person using the Customizer.
postMessage is the complete opposite. It’s a JavaScript API allowing you to enqueue a script in the preview responsible for updating the element associated with the setting. There’s no request to the server. The change is instantaneous. There are 2 major drawbacks. First, you have to write the JavaScript code to update the element. Second, it violates the DRY principle. You have to make the same updates as you do in your PHP template. This means you’ll have to modify it if your template ever changes, and that’s prone to errors.
Selective refresh is a hybrid method. It involves registering a callback function on the server responsible for returning the HTML markup just for the updated element. The Customizer requests this updated markup when the setting is modified and replaces the HTML in the preview with the new HTML. You have to specify the selector of the element to be updated when registering the callback, or more precisely – the partial, on the server.
Code Example
Let’s register our posts_displayed option.
function thm_add_posts_displayed_customizer( $wp_customize ) {
  $wp_customize->add_setting( 'posts_displayed', array(
    'type' => 'theme_mod',
    'capability' => 'edit_theme_options',
    'default' => 10,
    'transport' => 'refresh',
    'sanitize_callback' => 'absint', // You should specify a sanitization callback here
  ) );

  $wp_customize->add_control( 'posts_displayed', array(
    'type' => 'number',
    'section' => 'posts',
    'label' => 'Number of posts displayed',
    'active_callback' => 'thm_displays_posts', // If false, the control is not rendered in the Customizer
  ) );

  $wp_customize->add_section( 'posts', array(
    'title' => 'Posts',
    'description' => 'Control appearance of posts-related content',
    'panel' => '', // Not typically needed.
    'capability' => 'edit_theme_options',
  ) );
}
add_action( 'customizer_register', 'thm_add_posts_displayed_customizer' );